- Life Cycle of the Bee visual aid
- Beehive
- Plexiglas box for observation
- Cloth to cover the box
- Tape to stabilize and keep box closed
- Table for observation with umbrella
- Pollen
- Smoker, matches, and cotton balls
- Bee hat
Bees
Summary:
In this lesson, students study bees in the garden and the important role of pollinators while rotating through three stations: Beehive; Catch, Observe, and Release; and Honey Tasting.
Student Learning Goals & Objectives:
After this lesson, students will be able to:
- Feel comfortable around bees in the garden setting.
- Explain the benefits of having a hive in the garden.
Assessments:
During this lesson, students will:
- Safely catch, observe, and release honeybees and native bees.
- Discuss pollination, honey, and education as the benefits of having a hive in the garden.
Materials & Prep:
Hive Station
Catch, Observe, and Release Station
- Insect nets
- Large jars for observing
- Visual aid cards
Tasting Station
- Honeycomb
- 2 contrasting jars of honey for tasting (light and dark)
- Wooden stir sticks for tasting
- Bowl of sunflower seeds
- Serving spoon
- Fun fact cards
MATERIALS
- Prompt for Closing Circle
Before you begin
- Find areas in the garden where students will be able to observe bees
- If you have a hive, check the health of the hive
- Set up stations for catch and release, tasting, and hive
- Pull out a single comb and place it in the Plexiglas box
- Set box on table at the hive station for observation by students
Procedure Steps:
1
AT THE OPENING CIRCLE
Introduce the lesson and tell students that today they will learn all about bees.
- Invite students to share something they already know or think they know about bees by participating in a Think-Pair-Share activity.
- Ask several students to share out with the whole group.
- Explain that bees have three major interests: pollen, nectar, reproduction.
- Note that bees are not out to sting people.
- Clarify when and why bees sting and review the warning signs before they sting: fly away; buzz louder. Emphasize that stinging is the bee’s last resort
- Introduce the three stations and describe briefly what will happen in each one.
- Hive station: students will learn about the colony and observe the bees at work on the honeycomb.
- Tasting station: students will taste bee-related foods and learn about pollination.
- Catch, observe, and release station: students will learn about both honeybees and native bees, then go out into the garden to safely catch, observe, and release bees.
- Frame the Closing Circle question: “Why do we have a beehive in the garden?”
SMALL GROUPS, 40-60 MINUTES
2
BEEHIVE STATION
Explain to students that in this station they will first learn about the beehive and the role of the beekeeper. Then they will safely observe a honeycomb from the hive up close.
AT THE HIVE
- Ask students what type of behavior is best to have when approaching the hive (calm, relaxed, quiet).
- Point out the flight path to students – draw the analogy of a busy doorway and explain the importance of keeping the flight path clear.
- Explain that this is a top bar hive; the technique originated in Kenya and it mimics the way bees build their hives in nature. Compare it briefly to the Langstroth method of beekeeping, largely used by commercial beekeepers. Explain the different combs in each (one uses a foundation and the other starts with just the top bar).
- Now that students know how to safely be around the hive, explain to students that the beekeeper has two main priorities:
- Maintain the health of the hive by checking for parasites and intruders (other insects).
- Monitor the growth of the hive by checking in on the amount of eggs that the queen is laying
- Explain that when entering the hive, two factors are crucial: protection and distraction.
- Show students the bee hat and explain how the hat protects the face from any potential bee stings.
- Show students the smoker and demonstrate its use while also explaining how the bees become distracted. The smoke gives bees the illusion of a fire. In order to survive the flight away from the hive, bees will begin gorging on honey and are thus distracted from the beekeeper’s entrance.
- Explain that the beekeeper must work fast to avoid heat escaping from the hive. Bees are cold-blooded and need the hive to be around 95 degrees Fahrenheit.
- Show students how the bars line up and explain how the bees build the honeycomb on the bar.
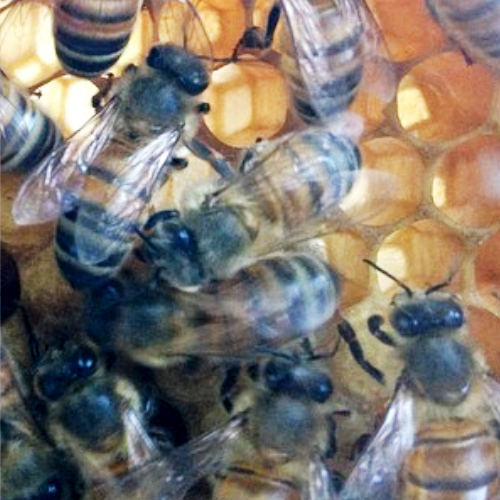
- Show students a honeycomb and pass it around while encouraging students to smell it.
- Open the observation window and explain how bees build the honeycomb starting with the bar closest to the entrance.
AT THE OBSERVATION TABLE
- Have students move to a separate table removed from the hive, where the observation comb is set up and ready for viewing. Remind students what type of behavior they should produce (calm, relaxed, quiet), emphasizing respect and no tapping of the glass window.
- Give students a chance to quietly listen to the hum of the bees before the next step.
- Let students know that there are two sides of the comb and that they should observe both sides by crouching down to its level. Allow a couple of minutes for students to observe and take note of what they see and generate questions. Once the time is up, ask students to raise their hand and take turns asking questions and making observations. Use the questions and observations to open up the conversation. If time allows, go over any other observations not mentioned or prompted by students.
- Explain that there are three types of honeybees in the colony:
- Queen: The queen’s job is to lay eggs (she can lay up to 2,500 a day). The queen can live three to five years.
- Drones: The male bees are called drones. The drones mate with the queen, typically in flight, and die shortly after. The population of the drones in the hive is low compared to worker bees. Drones are kicked out of the hive as winter approaches.
- Worker bees: They have the highest population in the hive and perform all of the following jobs: cleaning the hive, feeding the brood, attending the queen, receiving nectar and processing it into honey, building more wax comb, guarding bees, and foraging for nectar, pollen, and propolis.
- Explain that bees forage by collecting nectar and pollen from many flowers, storing the nectar in their bodies and storing the pollen in their pollen sacs.
- Give students an opportunity to observe the pollen in the jar and, if they want, to taste a little.
- Explain that bees use the comb to store nectar, lay the eggs, feed the larvae, and make honey.
- Beginning with the area of the comb closest to the bar, point out the following:
- Capped honey storage: bees can access the honey by poking a hole
- Bee nursery: brood cells for the queen to lay eggs
- Cells with nectar in them
- Larva and drones
- Bees transform the nectar into honey by regurgitating the stored nectar and fanning it with their wings. Bees also collect propolis, sap from the trees that they combine with wax to seal the hive from intruders.
- Show students bee pollen and point out the different colors of the pollen.
- Explain that different flowers have different-colored pollen and nectar, which affects the color of the honey.
- Explain to students how the queen bee is replaced in the hive.
- The queen bee can die while mating.
- When the queen is injured or old, the bees in the hive will pick 5-7 larvae to feed royal jelly in order to create the new queen bee.
- Multiple hatched larvae can compete to be the next queen.
- Explain to students that bees communicate within the hive by doing the bee dance.
- Dance in figure 8 loops.
- Bees can communicate the direction of the nectar source through a defined angle from their abdomen to the sun.
- Bees can communicate the distance of the nectar source through the length of the dance.
3
HONEY TASTING STATION
Explain to students that in this station, they will taste foods related to bees.
- Ask students what their favorite fruit is and explain that without pollinators, those fruits would not exist.
- Explain that the bee is an incredibly efficient pollinator but is not the only pollinator in the environment. Ask students for examples of different pollinators. Briefly explain pollination and define pollen as the genetic material from the male organ of the flower. Reference the three main interests of honeybees from the Opening Circle (nectar, pollen, and reproduction).
- Taste sunflower seeds and explain that honeybees are the primary pollinators for sunflower seed production.
- While students are enjoying the sunflower seeds, pass out honey fun fact cards and have students read aloud:
- An average worker bee makes 1/12 tsp of honey in her lifetime.
- To make a 16 oz. jar of honey, honeybees have to travel 112,000 miles and visit 4.5 million flowers.
- Honey is antibacterial and contains 80% sugar.
- Raw honey also boosts the immune system and soothes burns.
- Ask students if they know what honey is made of and how and why bees make it.
- Explain that worker bees collect nectar (sugar water or glucose). Have students recall that photosynthesis is the process by which all plants make sugar. Worker bees store nectar in their bodies and carry it back to the hive, where they then regurgitate it.
- The nectar in the hive becomes concentrated through a process of evaporation and transforms into honey.
- Pass out honeycomb tastings to each student.
- Show students the two different types of honey and ask why they might look and taste different.
- Explain to students that different flowers have different-colored pollen and nectar, which affects the color and taste of the honey. Explain how honey can be flower specific.
4
CATCH, OBSERVE, AND RELEASE STATION
Explain to students that in this station they will learn about honeybees and native bees, then safely catch, observe, and release bees in the garden.
- Review the three main interests of bees: nectar, pollen, and reproduction.
- Explain that only a female bee can sting. The bee’s stinger is in its oviduct, from which eggs are released. Male bees do not have stingers.
- Delineate the difference between native bees and honeybees (different colony sizes, body types; bees native to the Bay Area are actually solitary whereas honeybees are social).
- Also observe the bees’ fuzzy bellies and legs, which are ideal for collecting pollen.
- Does the bee have pollen sacs?
- Show images of honeybees and native bees.
- There are 85 species of bees in Berkeley, 1,600 in California, and between 20,000 and 40,000 in the world.
- Demonstrate how to catch and release bees while noting the following:
- Bees can see the colors purple and blue best, so when looking for bees try plants with purple and blue flowers.
- Bees do not fly downward very well.
- After catching the bee, look to see whether it is a native bee or honeybee and whether it is female or male.
- Explain to students that bees have been around for 130 million years and have co-evolved with flowers.
5
AT THE CLOSING CIRCLE
Have students answer the question “Why do we have a beehive in the garden?”
- Students participate in a Think-Pair-Share activity around the question. When students are done with their discussion, allow several students to share out with the whole group.
- Answers include but are not limited to: so we can have honey; to have more pollinators (i.e. more fruit); an educational tool to teach people about bees.
Bees in the Edible Schoolyard Garden
Download Lesson Materials
Vocabulary:
- Honeycomb
- Pollen
- Nectar
- Drone
- Queen bee
- Larva
- Native bee
- Honeybee
Teaching Notes:
- This lesson came about by seeing the need for people to feel comfortable in the garden setting. Students would often feel scared and “freak out” when they saw a bee. Through the power of educating ourselves, we believe that we can often overcome our fears about insects and learn to coexist, creating a more comfortable experience in the garden.
Edible Schoolyard Standards
In the Garden Clasroom, Grade 6
Concepts
3.09
Observe the garden as a habitat for pollinators, understand the impact of pollination on our food supply, develop appropriate responses to them, and consider the multitude of habitats throughout the garden.
Contributors:
All lessons at the Edible Schoolyard Berkeley are a collaboration between the teachers and staff of the Edible Schoolyard and Martin Luther King, Jr. Middle School.
This lesson follows the BEETLES Project’s Learning Cycle (Invitation > Exploration > Concept Invention > Application > Reflection) and uses their Discussion Routines (e.g. Think-Pair-Share and Whip-Around). For more information, review the BEETLES Learning Cycle (PDF) and Discussion Routines (PDF) documents or visit beetlesproject.org.